Introduction to CapRover
In the rapidly evolving landscape of cloud computing, Platform as a Service (PaaS) solutions have become essential for developers seeking to deploy and manage applications without the burden of infrastructure management. CapRover, an open-source PaaS, has gained popularity for its ease of use, flexibility, and cost-effectiveness. Often dubbed “Heroku on your own server,” CapRover simplifies application and database deployment using Docker, Nginx, and a user-friendly interface. This article delves into CapRover’s features, its integration with other software stacks, a step-by-step installation guide, practical usage, and a comparison with alternative PaaS solutions.
What is CapRover?
CapRover is an open-source PaaS that streamlines the deployment and management of web applications and databases. Built with TypeScript and released in 2017, it leverages Docker, Nginx, Let’s Encrypt, and NetData to provide a robust yet simple platform for deploying applications in languages like Node.js, Python, PHP, Ruby, and Go, as well as databases like MySQL, MongoDB, and PostgreSQL. CapRover’s design emphasizes developer productivity, offering a web GUI, CLI, and one-click app deployments to reduce setup complexity.
Key features include:
- Web GUI and CLI: A browser-based dashboard and command-line interface for managing apps.
- One-Click Apps: Pre-configured templates for deploying apps like WordPress, MySQL, or MongoDB.
- Docker Swarm: Uses Docker Swarm for containerization and clustering.
- Nginx Load Balancing: Fully customizable Nginx templates for routing traffic.
- Free SSL: Automatic SSL/TLS certificates via Let’s Encrypt.
- No Lock-In: Apps remain functional even if CapRover is removed.
CapRover is ideal for developers, small businesses, and teams seeking a self-hosted, cost-effective PaaS that rivals commercial platforms like Heroku.
Integration with Other Software Stacks
CapRover integrates seamlessly with modern development tools, enhancing its utility in diverse software ecosystems:
- Docker: CapRover uses Docker Swarm for containerization, allowing it to deploy any Docker-based application. It can pull images from registries like Docker Hub or Harbor.
- CI/CD Pipelines: Integrates with GitHub Actions, GitLab CI, or Jenkins to automate deployments via webhooks or CLI commands like caprover deploy.
- Databases: Supports one-click database deployments (e.g., PostgreSQL, MongoDB) through its marketplace, with automatic environment variable configuration.
- Monitoring: Integrates with NetData (included by default) for server monitoring and can connect to external tools like Prometheus or Grafana for advanced metrics.
- SSL/TLS: The Let’s Encrypt integration automates SSL certificate provisioning, ensuring secure HTTPS connections.
- Version Control: Supports Git-based deployments, allowing developers to push code from repositories like GitHub or GitLab.
- Infrastructure: Runs on any VPS or cloud provider (e.g., DigitalOcean, AWS, Hetzner) with Docker support, making it platform-agnostic.
This interoperability makes CapRover a versatile choice for microservices, monolithic apps, or static sites, streamlining workflows for developers.

Setting Up a CapRover Environment: Step-by-Step Installation Guide
This guide covers installing CapRover on an Ubuntu 22.04 VPS (e.g., DigitalOcean droplet or local VM) for a production-ready setup.
Prerequisites
- Hardware: 1GB RAM (2GB recommended), 10GB disk space, 1 CPU core.
- Software:
- Ubuntu 22.04 LTS (or compatible Linux distribution).
- SSH access with root privileges.
- Domain name (optional, for custom domains).
- Tools: Docker, Git, and a local machine with SSH.
Step-by-Step Installation
Step 1: Set Up the Server
- Provision an Ubuntu Server:
- Create a VPS on DigitalOcean, Hetzner, or a local VM.
- Update the system:bash
sudo apt update && sudo apt upgrade -y
- Install Docker:bash
sudo apt install -y docker.io sudo systemctl enable docker sudo systemctl start docker
Step 2: Install CapRover
- Run the CapRover Installation Script:bash
sudo docker run -p 80:80 -p 443:443 -p 3000:3000 -v /var/run/docker.sock:/var/run/docker.sock -v /captain:/captain caprover/caproverThis pulls the CapRover image and starts the setup process. - Access the Web GUI:
- Open http://<server-ip>:3000 in a browser.
- Set up the admin password (save it securely).
- Configure CapRover:
- In the GUI, go to Settings > Cluster and set the domain (e.g., example.com) or use the server’s IP for testing.
- Enable HTTPS and Let’s Encrypt if using a domain.
Step 3: Configure DNS (Optional)
- Set Up a Wildcard Subdomain:
- Add a DNS A record for *.example.com pointing to your server’s IP.
- Update CapRover’s domain settings in the GUI:bash
caprover serversetup --domain example.com
- Enable Let’s Encrypt:
- In the GUI, go to Settings > SSL and enable Let’s Encrypt for automatic SSL certificates.
Step 4: Install the CapRover CLI (Optional)
- Install the CLI:bash
npm install -g caprover - Log in to CapRover:bash
caprover login --caproverUrl http://<server-ip>:3000 --caproverPassword <admin-password>
Step 5: Verify Setup
- Check Docker Services:bash
sudo docker psEnsure CapRover containers (e.g., caprover/caprover) are running. - Access the Dashboard:
- Visit http://<server-ip>:3000 or https://captain.example.com to confirm the GUI is accessible.
Troubleshooting
- Port Issues: Ensure ports 80, 443, and 3000 are open (sudo ufw allow 80,443,3000).
- DNS Errors: Verify DNS records propagate correctly (use dig *.example.com).
- Docker Failures: Restart Docker (sudo systemctl restart docker).
Using CapRover
Deploying an Application
- Create a Sample App:
- Create a Node.js app (app.js):javascript
const express = require('express'); const app = express(); app.get('/', (req, res) => res.send('Hello from CapRover!')); app.listen(process.env.PORT || 3000); - Create package.json:json
{ "name": "caprover-app", "version": "1.0.0", "dependencies": { "express": "^4.17.1" } }
- Create a Node.js app (app.js):javascript
- Create an App in CapRover:
- In the GUI, go to Apps > Create New App and name it my-app.
- Alternatively, use the CLI:bash
caprover app create --appName my-app
- Deploy via Git:
- Add the CapRover remote:bash
git remote add caprover caprover@<server-ip>:my-app - Push the app:bash
git push caprover main
- Add the CapRover remote:bash
- Access the App:
- Visit http://my-app.example.com or http://<server-ip>:<port>.
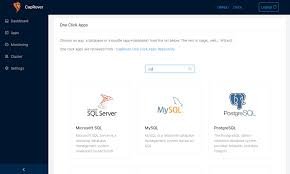
Deploying a One-Click App
- Install WordPress:
- In the GUI, go to One-Click Apps/Databases > WordPress > Deploy.
- Configure settings (e.g., admin email) and deploy.
- Access WordPress:
- Visit the assigned URL (e.g., http://wordpress.example.com).
Managing Databases
- Deploy PostgreSQL:
- In the GUI, go to One-Click Databases > PostgreSQL > Deploy.
- Note the generated connection string (e.g., DATABASE_URL).
- Link to App:
- In the app’s settings, add the DATABASE_URL as an environment variable.
- Redeploy the app:bash
caprover deploy --appName my-app
Scaling and Monitoring
- Scale Instances:
- In the GUI, go to Apps > my-app > Scale and set the instance count.
- Via CLI:bash
caprover scale --appName my-app --instances 2
- View Logs:
- In the GUI, go to Apps > my-app > Logs.
- Via CLI:bash
caprover logs --appName my-app
Comparison with Alternatives
CapRover competes with PaaS solutions like Heroku, Dokku, Cloud Foundry, and Coolify. Here’s a comparison:
| Feature | CapRover | Heroku | Dokku | Cloud Foundry |
|---|---|---|---|---|
| Open Source | Yes (Apache 2.0, with noted restrictions) | No (proprietary) | Yes (MIT) | Yes (Apache 2.0) |
| Deployment Model | Docker, single/multi-server | Git push, cloud-only | Git push, single server | Push-based, multi-cloud |
| Ease of Use | High (GUI, CLI, one-click apps) | Very high (intuitive) | High (Heroku-like) | Moderate (BOSH complexity) |
| Scaling | Manual (Docker Swarm) | Auto/manual scaling | Manual scaling | Auto-scaling, enterprise-grade |
| Service Marketplace | One-click apps (WordPress, MySQL, etc.) | Extensive add-ons | Plugins (e.g., PostgreSQL) | Extensive (service brokers) |
| Multi-Cloud | Moderate (any Docker host) | Limited (Heroku cloud) | Limited (single server) | Strong (AWS, Azure, GCP) |
| Learning Curve | Low (minimal Docker knowledge) | Very low | Low (Git, Docker) | Moderate (BOSH, CLI) |
| Resource Usage | Lightweight (1GB RAM minimum) | Cloud-based (managed) | Lightweight (single server) | Heavy (multi-node) |
| Community Support | Moderate (single maintainer concerns) | Limited (proprietary) | Active but small | Strong (Cloud Foundry Foundation) |
Pros of CapRover
- Ease of Use: Web GUI and one-click apps simplify deployment.
- Cost-Effective: Free, runs on low-cost VPS (e.g., $5/month vs. Heroku’s $25/month).
- Flexibility: Supports any Docker-based app and multiple languages.
- Scalability: Docker Swarm enables multi-node setups.
Cons of CapRover
- Licensing Concerns: As of July 2023, CapRover’s modified Apache license and EULA requirements have raised questions about its open-source status.
- Limited Auto-Scaling: Manual scaling compared to Cloud Foundry’s automation.
- Single Maintainer: Development pace and issue resolution may lag.
- Persistent Data: Limited support for persistent data across multiple nodes.
When to Choose CapRover
- Ideal for small to medium-sized projects needing a simple, self-hosted PaaS.
- Best for developers familiar with Docker seeking cost savings.
- Less suitable for large-scale enterprise deployments requiring advanced features (Cloud Foundry or OpenShift may be better).
Conclusion
CapRover is a compelling open-source PaaS that empowers developers to deploy applications effortlessly on their own infrastructure. Its Docker-based architecture, one-click app marketplace, and user-friendly GUI make it a standout choice for small teams and individual developers. The installation guide above demonstrates its straightforward setup, while its integrations with Git, CI/CD tools, and databases ensure flexibility. Despite concerns about its licensing and scalability limitations, CapRover remains a cost-effective alternative to commercial PaaS like Heroku. For further exploration, visit the official CapRover documentation (https://caprover.com) or engage with its GitHub community. Whether deploying a blog or a complex web app, CapRover offers a streamlined path to cloud-native development.